Connector configuration and attribute mapping
Connector configuration
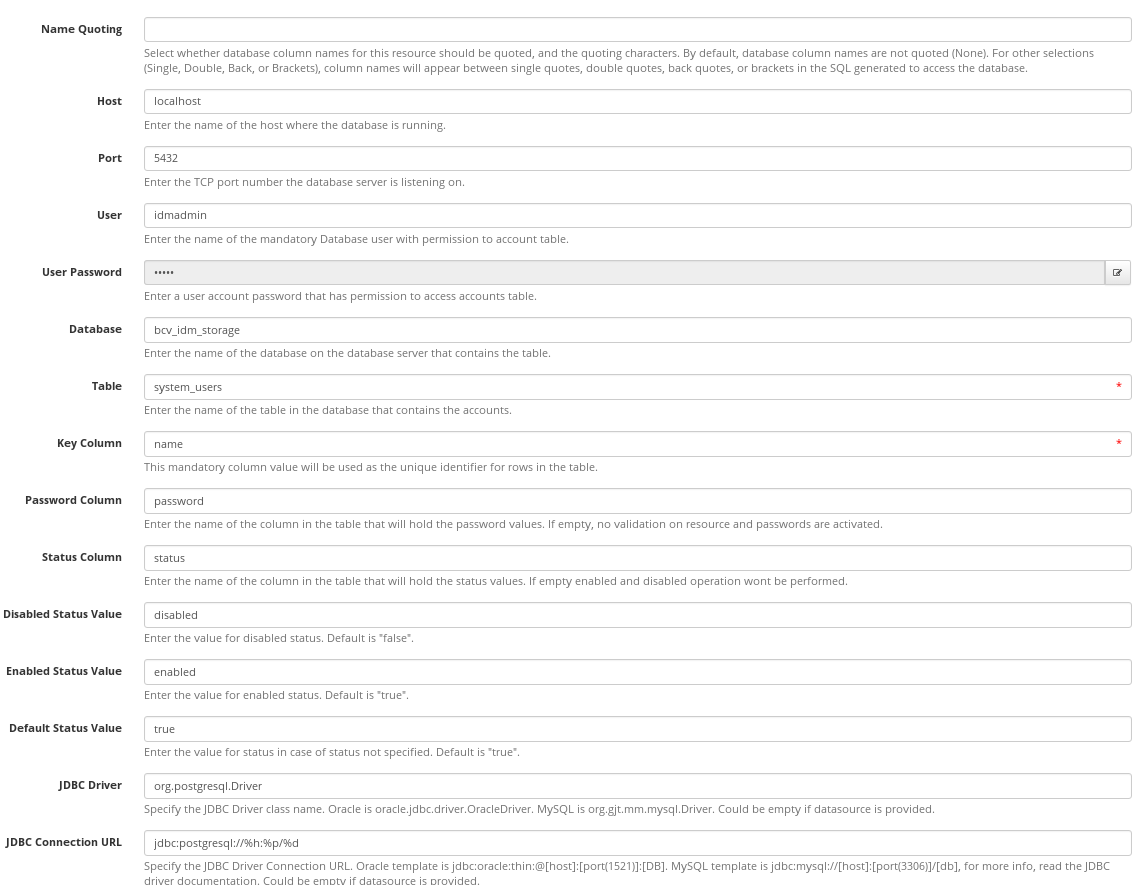
Creation of a newly connected system will be demonstrated on a database connector (ConnIdDBBundle). Firstly, we will create a new system named Table and choose the database connector. All settings for this connector are available in the Configuration tab. In the picture below is an example of the configuration:
System scheme
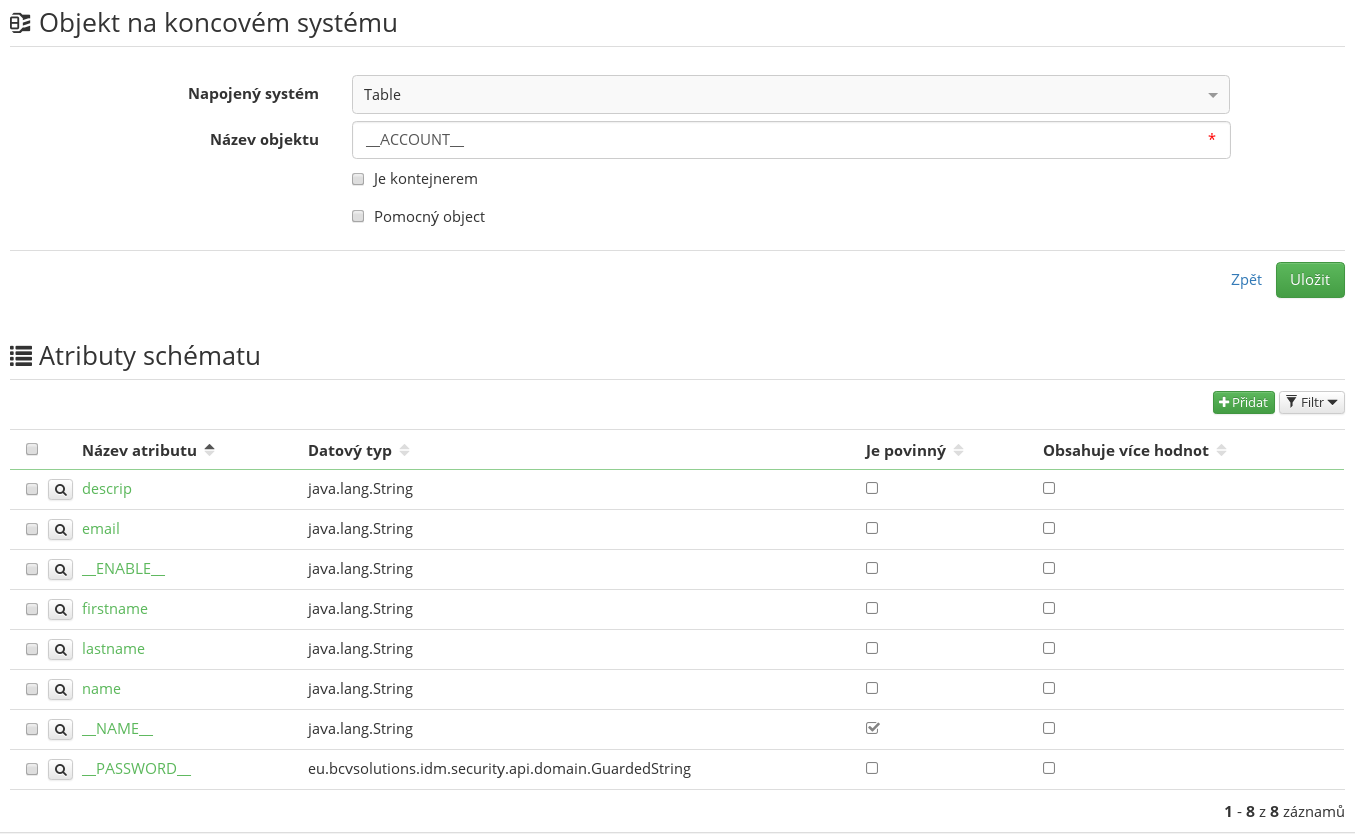
When the connector is configured correctly, we can move on to the System scheme tab. There, we will create the scheme either manually or we will use the scheme which will be returned by the connector itself (according to the filled-in configuration).
The scheme will be automatically created by pressing Generate scheme.
After a successful generation, there should be a new entry (object class) __ACCOUNT__ in the object types table. This entry will contain available attributes in the system (for object ACCOUNT). In our case, it will contain an attribute for each column in the mapped table and the semantic attributes:
- __NAME__ - attribute identifying the account in the system (user name).
- __PASSWORD__ - attribute for password mapping for the given account.
- __ENABLE__ - attribute for mapping the indication whether the account is enabled or disabled.
Attribute mapping
When the system scheme is created, we can move on to attribute mapping in the Attribute mapping tab. Mapping serves two basic purposes:
- Making the scheme attributes accessible in the IdM system. Only mapped attributes can be used in IdM for active operations (provisioning/synchronization). Mapping is always tied to the operation type and entity type (identity, group).
- It defines which value will the attribute be mapped into in the IdM system. (identity, group, extended attribute, hidden attribute).
Firstly, we will create a group (operation type and entity type) which we would like to map. We will select Provisioning and Identity. Then we will start creating the individual mappings. It is very important to create a mapping for the account identifier in the system and connect it correctly to the IdM identity. This is done by adding a new attribute.
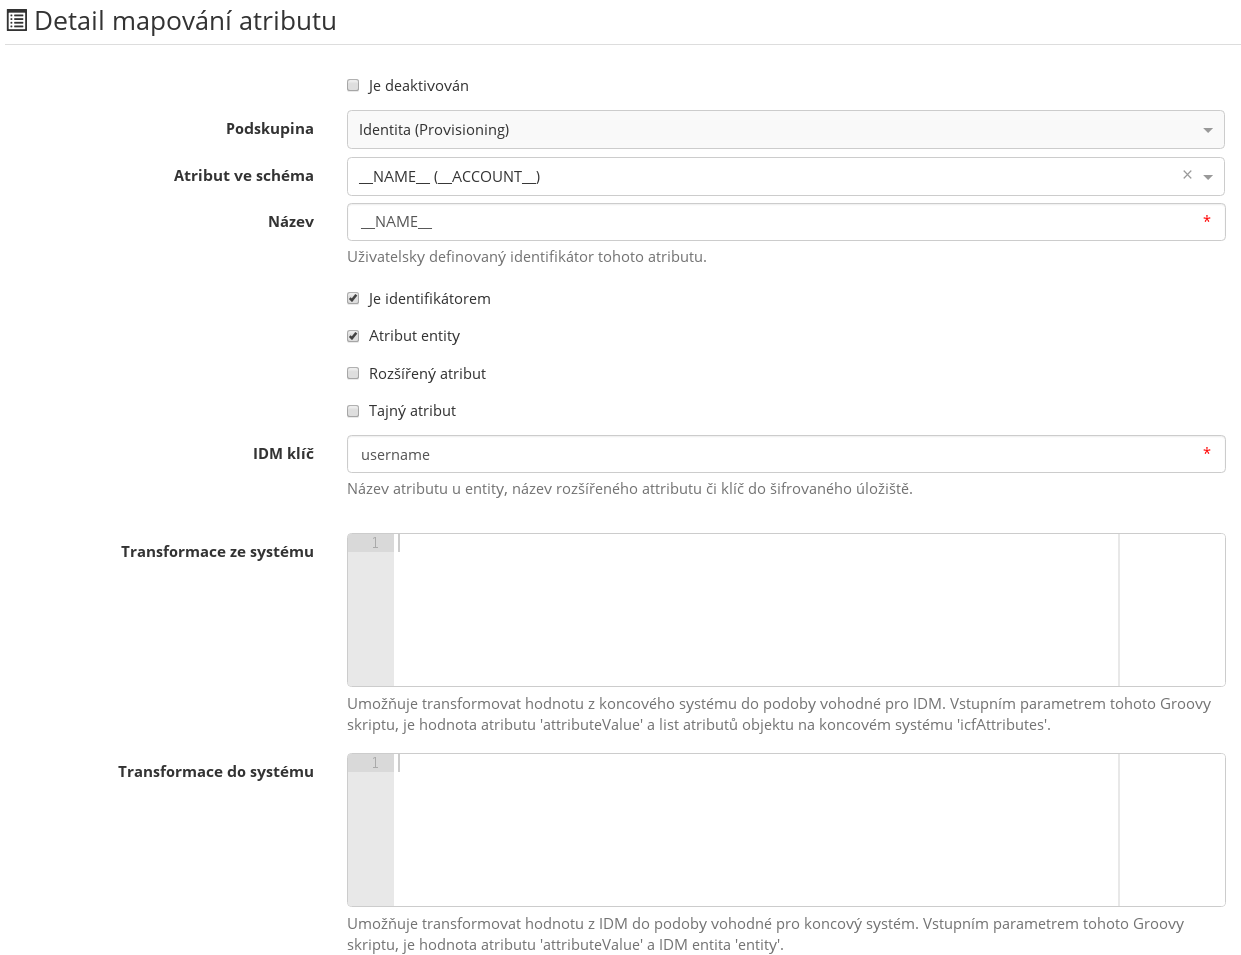
In the attribute mapping details we will fill in:
- The attribute from the system scheme which identifies the account, i.e. __NAME__.
- Fill in the name of the mapped attribute. It is pre-filled with the scheme attribute name but any other name can be used.
- Tick Is identifier.
- Tick Entity attribute. The attribute will be tied to the user name of the identity in IdM.
- Fill in username as the IdM key.
Password mapping
If we want to map a password attribute, it is enough to map the attribute __PASSWORD__ and not fill anything else (no attribute of entity and nothing else). When a new account is created, we do not know current user password. Therefore a new password for the account will be generated by password policy that is set for the system. Note that the password is generated only for CREATE operations and only if the attribute __PASSWORD__ is NULL. New password will be sent to the user by notification newPassword.
Send additional attributes with password
It's possible to send additional attributes to provisioning, when password is changed (e.g. password expiration in extended attribute). New flag sendOnPasswordChange was added to system attribute mapping - attribute with this flag checked will be send together with changed password to provisioning. Two ways for provisioning additional attributes are implemented:
- send additional attributes together with new password in one provisioning operation
- send additional attributes after password is changed in another provisioning operation
Two ways are be configurable by application configuration idm.sec.acc.provisioning.sendPasswordAttributesTogether:
true: additional password attributes will be send in one provisioning operation together with passwordfalse: additional password attributes will be send in new provisioning operation, after password change operation (some systems doesn't support to change other attributes in the same request with password)
Linking a role
In the previous paragraphs, we created a system which contains a scheme and mapped attributes for an identity and provisioning. In order to create an account for a specific user in the end system, we have to create a role which will be assigning this system and, at the same time, we have to assign this role to the user.
- We will create a new role Table role.
- In the Connected systems tab, we will create a new connection to our system Table for the entity Identity.
- We will assign this role to a user. We will do this in the user details in the Assigned roles tab.
- After successfully assigning the valid role, a corresponding account in the system should be created. We can check this in the "System accounts" tab, where a link to the account should have been created.
- We can also check the account creation in the Table system. A link to the user account should have been created in the System entities tab.
- System identifier, which is an identifier returned by the system after the creation of the account.
Linking a role - attribute overload
In the previous chapter we explained how to assign a role tied to a system. By doing this, we created an account which corresponds precisely to the mapping in the system. That was a default mapping. However, if want to create a role which will affect only a specific attribute, we will need to adjust the behavior (mapping) of the attribute, i.e. we will need to overload the attribute mapping.
- We will create a new role Table role - first name.
- Add the same system mapping as with the Table role role.
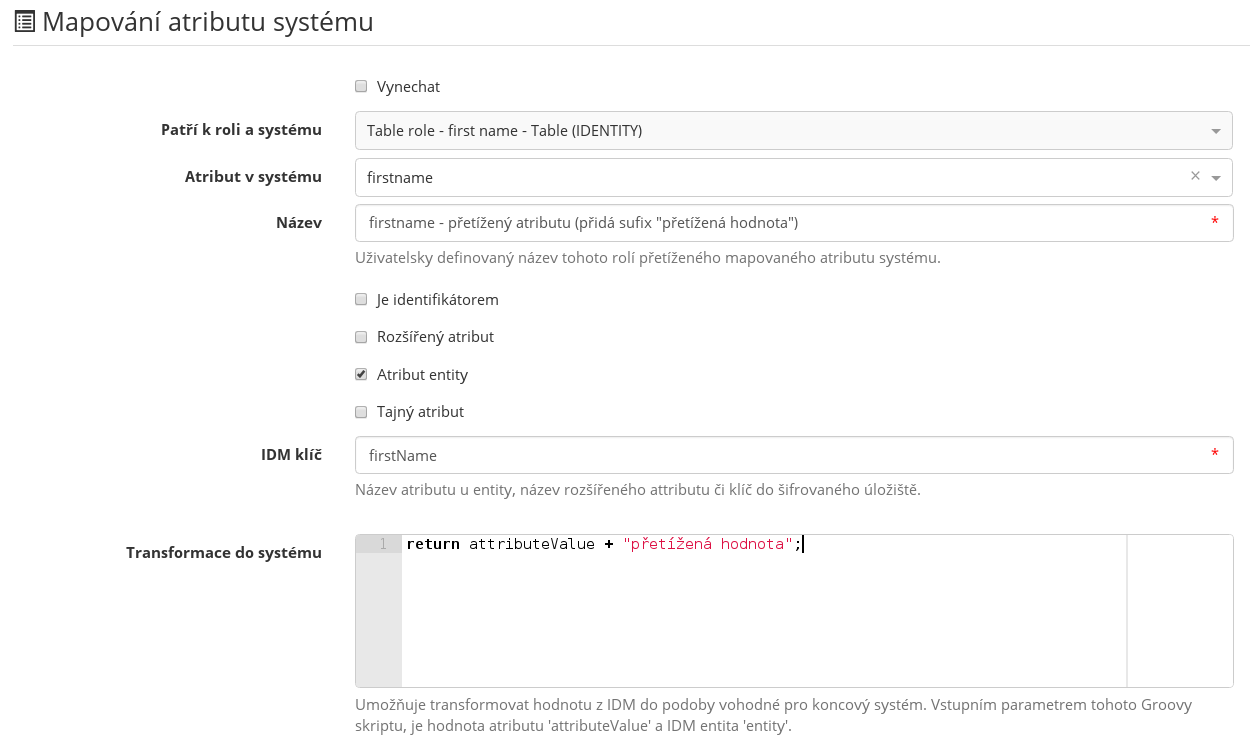
- In the Attributes mapped within this role table, we will add a new attribute which will overload the default attribute firstname.
- Fill in the name - for example "firstname - overloaded attribute (adds the "overloaded value" suffix)".
- Tick Entity attribute.
- Fill in firstName as the IdM key.
- Insert "return attributeValue + "overloaded value";"" in the script for transformation into the system.
- Now, if the role is assigned to a user, the account on the end system Table will contain the overloaded value suffix in the firstname attribute.
Mapped attribute strategy
The attribute strategy defines how will the attribute and primarily its value be dealt with during provisioning and synchronization.
The strategies are as follows:
SET (set as IdM calculates)
The default strategy which sends the acquired value to the end system as IdM calculates it. If the value is the same on the end system, the attribute isn't sent.
This strategy is applied both to account editing and its creation.
WRITE-IF-NULL (Set only if the value on the system is null)
The attribute value which is calculated by IdM is sent to the end system only if the end system value is calculated as equal to null. Before the final comparison whether the value is non-existent, transformation from the system is applied to the attribute value from the end system. The transformation is defined in the mapping of the attribute.
This strategy is applied both to account editing and its creation.
CREATE (Set only when creating)
The attribute value which is calculated by IdM is sent to the end system only when creating a new account on the end system.
The CREATE strategy has a lower priority than WRITE-IF-NULL, SET, MERGE and AUTHORITATIVE-MERGE.
AUTHORITATIVE_MERGE (Authoritative merge)
This strategy (identically to MERGE) alters the logic of calculating attributes and their values. With the other strategies applies the following: if there are more occurrences of the same strategy for the same attribute (more overloaded attributes in more roles), the one with the highest priority is found (according to role priorities or their names). The resulting value going into provisioning is calculated on the basis of this one attribute only.
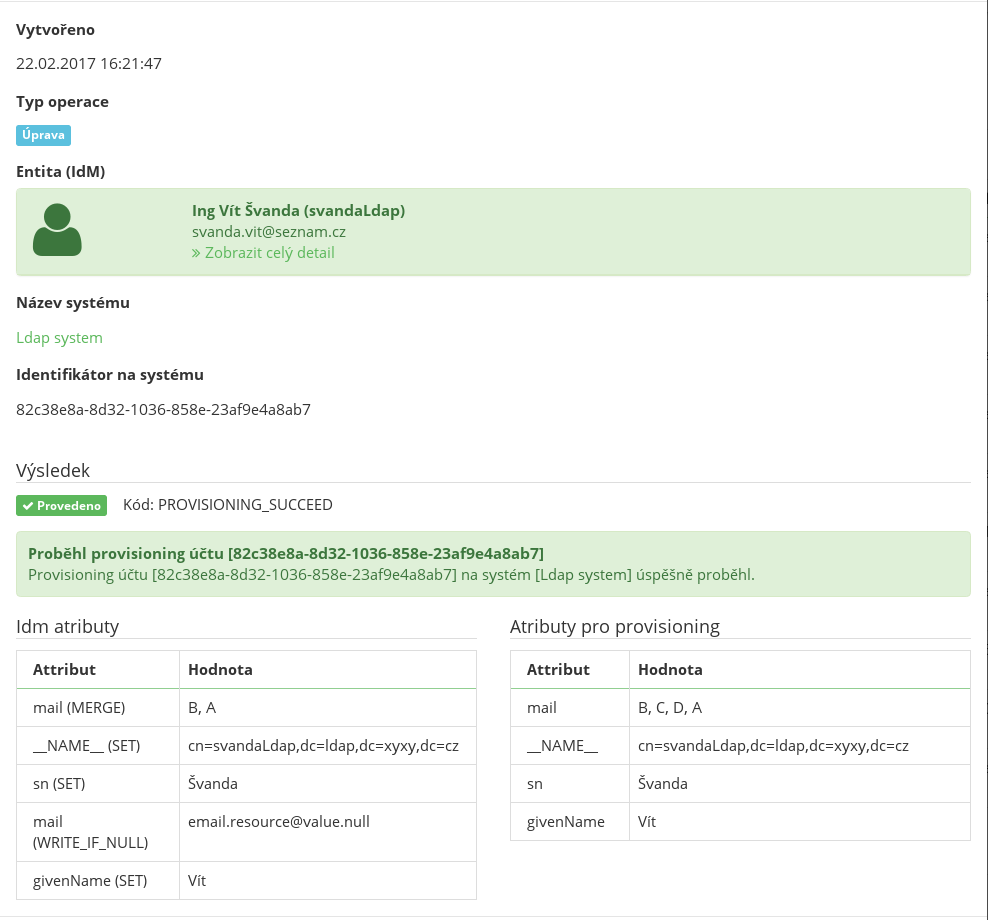
The MERGE strategies are different, however. If there are more attributes overloading the same default attribute, all the values are merged into one. This resulting value (list) is sent to the IdM system as a "wish" of how the value should look like on the end system.
With authoritative merge, the original values of the attribute on the end system are not taken into account (i.e. if some other system or administrator had put a different value to the attribute, it would be ignored by IdM).
Therefore, in a situation where the resulting value of the merged attribute from IdM is [A,B] and the value of the same attribute on the end system is [C,D], then the end system attribute will gain the value of [A,B] after provisioning.
MERGE (Merge)
This strategy follows the same pattern as authoritative merge up until the phase of creating a "wish" for IdM.
A procedure different from authoritative merge occurs at the moment of provisioning. The goal is to ensure that the attribute on the end system can be shared by more systems.
Therefore, in a situation where the resulting value of the merged attribute from IdM is [A,B] and the value of the same attribute on the end system is [C,D], then the end system attribute will gain the value of [A,B,C,D] after provisioning.
Another goal is to ensure the correct removing of the managed values.
Let us continue with the previous case, where the value [A,B,C,D] is on the end system. If we remove the role which was defining value B in IdM, then the value on the end system must be [A,C,D] after provisioning. We will then remove only the value which we are managing.
A provisioning archive is used to effectively identify which values were added by IdM. The archive contains the history of all the executions of provisioning, both the values actually sent to the end system and the "wish" calculated by IdM. It is this wish that enables us to delete the correct values (i.e. those added by the IdM system).
In our case we have the following information at our disposal:
- The current wish of IdM for this attribute is value A.
- From the history of the last successful provisioning, we know that the previous wish of IdM was value [A,B].
- The current value on the end system is [A,B,C,D].
By comparing these values, we can deduce that we have to remove value B, so that the result is value [A,C,D].
An advantage of this approach is the ability of detecting dynamic changes as well. This means that if we don't remove the role which assigned value B, but instead we change the calculation definition of this value, so that the result is X, then it follows from the above mentioned that we are able to correctly identify that we want to send value [A,X,C,D] to the end system.
Additional characteristics of strategies
Aside from a strategy, every attribute can also have the indications Always send and Send only if IdM value exists. These indications can be combined with all strategies.
- Always send - Ensures that the attribute will be sent to the end system even when it has been assessed that its value hasn't changed.
- Send only if IdM value exists - Ensures that the attribute will be sent only when the calculated IdM value has some value (if it is a String type value, it cannot be blank). This setting ensures that the IdM system doesn't delete attribute values on the end system when it can't calculate them.
