Systems - CSV file: users contracts synchronization
What is synchronization of contractual relationships?
The principle of this synchronization is the same as for identity synchronization. However, the aim of this synchronization is not a direct identity, but his/her contractual relationship. More on what constitutes a contractual relationship can be found here.
What you need before you start
- You need to install CzechIdM 7.5.0 (and higher).
- You need to be logged in as 'admin'.
- You need to have two users ready: 'john.doe' and 'john.roe'.
Create data with contracts in CSV format
First we need to create sample data that we will synchronize. We will be using the CSV connector, for which we need to create a CSV source file with our sample contracts.
Here are the sample data in CSV format:
ID,NAME,STATE,DISBLED,DESCRIPTION,VALID_FROM,VALID_TO,TEAM_LEADER,LEADER,MAIN,CHANGED,ORGANIZATION_NAME,ORGANIZATION_CODE,OWNER
1,"Contract one","30","false","visualize dot-com ROI","2016-05-04","2016-06-21","john.doe","john.doe","true","2016-06-25","Skinder","68016-376","john.roe"
2,"Contract two","20","true","revolutionize viral experiences","2017-04-06","","","","true","2016-06-15","Einti","60429-911","john.roe"
Create a new file "contracts.csv" which contains the above data. This file can be saved in your user space. In my case, the path is: "/home/svandav/csv/contracts.csv".
Create system 'Contracts - CSV'
Create a new system in CzechIdM, with the name 'Contracts - CSV'.

Connector configuration
Now we can configure the CSV connector and its settings.


Generate schema
Once we have configured the system, we need to generate its schema. Go to the scheme tab and click on the "Generate scheme" button.

Create sync mapping
System mapping for synchronizing contractual relationships can be created in the tab "Mapping".

Create mapped attributes
Now we have to map our attributes. These are definitions specifying the way the data from our CSV file should be represented in IdM.
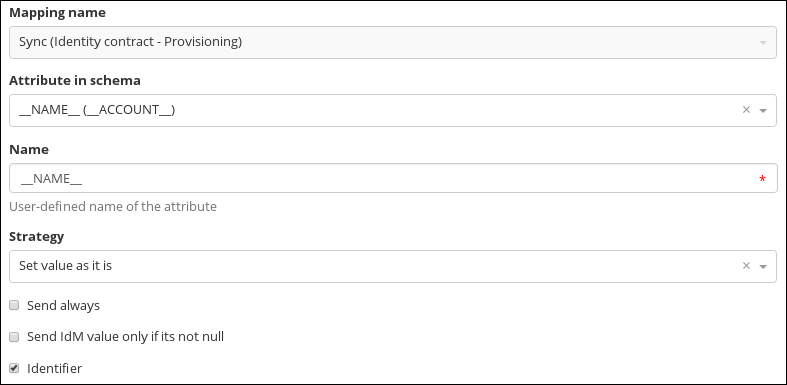
Primary attribute
One of the attributes must be selected as primary identifier.
- Select '_ _ NAME _ _' from schema attributes.
- Checkbox 'Identifier' must be checked.

Name attribute
Defines the name of the contractual relationship.
- Select 'NAME' from schema attributes.
- Tick checkbox 'Entity attr.'.
- In the 'Entity field' select the item 'Name of positions'.

Guarantee attribute
Defines the list of superiors, directly linked to the contractual relationship (more details see below).
- Select 'LEADER' from schema attributes.
- Tick checkbox 'Entity attr.'.
- In the 'Entity field' select the item 'Guarantees'.

Owner attribute
Defines relation owner. Must be an identity in IdM. This field is required for every relation.
- Select 'OWNER' from schema attributes.
- Tick checkbox 'Entity attr.'.
- In the 'Entity field' select the item 'Owner'.

Valid from attribute
Valid from - Validity for the contractual relationship. This attribute requires LocalDate type. For this we need need to transform our data (as show example below).
import org.joda.time.LocalDate;

if(attributeValue){
    return new LocalDate(attributeValue);
}
- Select 'VALID_FROM' from schema attributes.
- Tick checkbox 'Entity attr.'.
- In the 'Entity field' select the item 'Valid from'.
- Paste transformation to "Transformation from the system"

Valid till attribute
Valid till - Validity for the contractual relationship. This attribute requires LocalDate type. For this we need to transform our data (as show example below).
import org.joda.time.LocalDate;

if(attributeValue){
    return new LocalDate(attributeValue);
}
- Select 'VALID_TO' from schema attributes.
- Tick checkbox 'Entity attr.'.
- In the 'Entity field' select the item 'Valid till'.
- Paste transformation to "Transformation from the system"

State attribute
State of contract. In some situations information can be needed to determine the result state in multiple attributes. For example, we can have an attribute 'state' with one of multiple values (10,20,30) and a second attribute 'disabled' (with value true/false). In this case states '10' and '30' mark that contractual relation is 'excluded', but when the attribute 'disabled' will be 'true', then the final state of relation must be 'DISABLED'.
To resolve the situation described above we created the transformation script 'compileIdentityRelationState'.
- Select 'STATE' from schema attributes.
- Tick checkbox 'Entity attr.'.
- In the 'Entity field' select the item 'State'.
- In the 'Transformation from the system' area, click on 'Insert script' and select 'compileIdentityRelationState'.

Create sync configuration
We have created a system with mapped attributes. Now we need to create synchronization configuration.
- Go to the tab 'Synchronization' and create a new item.
- Tick checkbox 'Allowed'.
- Tick checkbox 'Reconciliation'.
- Fill the name of sync 'Sync contracts'.
- In the selectbox 'Set of mapped attributes', select 'Sync - Identity contract - Synchronization'.
- In the selectbox 'Collation attribute' (in 'Not linked' section), select '_ _ NAME _ _'.
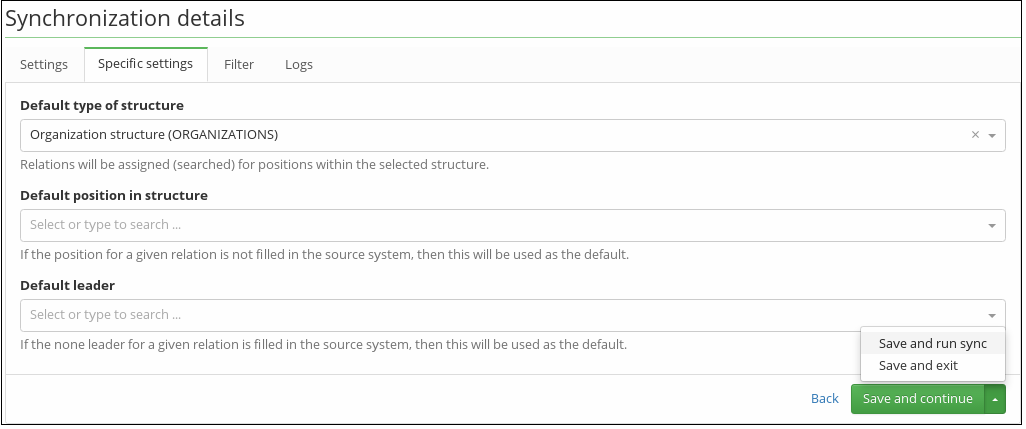
- On the tab 'Specific settings' select some 'Default type of structure'. In this example it does not matter which type of structure you select, because we do not want to sync relation between an organization structure and a contract relationship now.
- Save the sync configuration by clicking 'Save and continue'.

Start sync
- On the detail of the sync configuration click on the drop down button and select 'Save and run sync'.

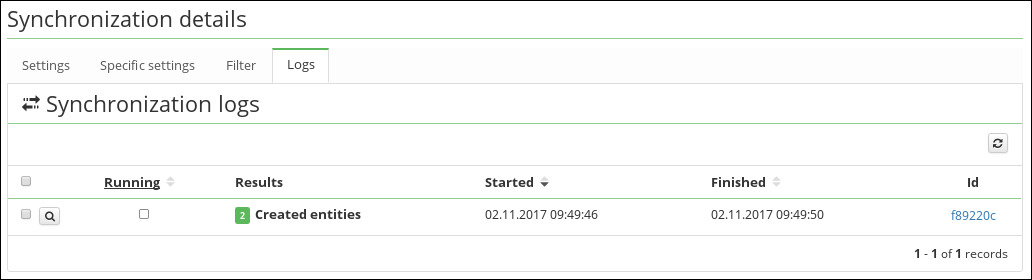
Log of sync
After the sync ended (it should not take than a few seconds), you can check result of sync.
- Go to the tab 'Logs' (in the sync configuration detail).
- Refresh table with logs (reload button at the top right on the table).
- You should see this:

Check contracts on user 'john.roe'
Finally, you can check the new contract relations of the user 'john.roe'.
- Find the user 'john.roe'.
- Go to his detail and to the tab 'Positions'.
- You should see three contracts:
- Default contract (created for this user automatically).
- Contract one - has to be in the state excluded and as an authorizer it must have the user 'john.doe'.
- Contract two - has to be active (state is empty).
