Table of Contents
Remote connector server
Why use remote connector server?
System CzechIdM has available only certain types of connectors. If we want to use another connectors, such as Active Directory or Google Apps, we need to use a remote connector server with other connectors.
How to set up a remote connector server?
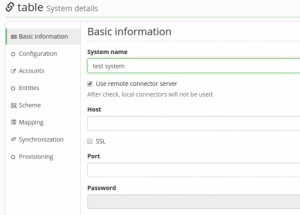
On the system tab we will create a new system. In the detail of this system, check option "Use remote connector server" and fill everything form field that system needed to connect to the remote system. For connection it is necessary to fill the host and port on which the connector is available on remote server. If server is secured by password you will need fill the password for connect to remote connector server. Password for connect will be stored in local confidential storage.
After saving all the necessary information to the remote connector of the server, we will go to the "Configurations" tab. From now will be available only connectors on the remote connector server. The functionality of the remote connector server can be verified as well as the functionality of the local connector - using the "Test connector".
How does a remote connector server works in CzechIdM?
The remote server connector configuration form behaves just like the local connector form - this means that definition is stored in the EAV attributes for system which it belongs. As a key to EAV attributes are used the system name, connector name, and connector version. Therefore, it is possible to have multiple connectors with different version on the remote connector server.
Example of remote connector server setup
We need download remote connector server from connid. Now is recommended use version 1.4.2 of remote connector server. Create a new folder for the connector (already on the remote server) in this folder create two new subfolders:
- bundles - folder for connectors,
- lib - folder for external libraries.
To folder bundles download all cannector you need. Download from this url. Now you go to parent of folder bundles and copy all files from archive folder: connector-server-zip-1.4.2.0.zip/connid-connector-server/lib/framework/.
Now we need only configuration properties, this file we will found in jar, path: connector-server-zip-1.4.0.0.zip/connid-connector-server/lib/framework/connector-framework-internal.jar/org/identityconnectors/framework/server/connectorserver.properties .
Start remote connector server
All commands execute in root folder remote connector server.
Run connector server:
java -cp "connector-framework.jar:connector-framework-internal.jar:groovy-all.jar" org.identityconnectors.framework.server.Main -run -properties connectorserver.properties
Run connector server at background:
java -cp "connector-framework.jar:connector-framework-internal.jar:groovy-all.jar" org.identityconnectors.framework.server.Main -run -properties connectorserver.properties &
Set password for remote connector server to '123456'
java -cp "connector-framework.jar:connector-framework-internal.jar:groovy-all.jar" org.identityconnectors.framework.server.Main -setKey -key 123456 -properties connectorserver.properties
Another settings (such as log) will be found at configurations file: connectorserver.properties

